|

Install OpenVR XR Plugin to run a VR Headset
This plugin interferes with Mac and WebGL publish. VR with Vive and SteamVR only works on PCs.
Do this at school at a computer with a VR headset.
Transfer your project to the desktop of the PC with VR at school.
Select File->Build Settings...
Select PC, Mac & Linux Standalone
Select Switch Platform
Close the window
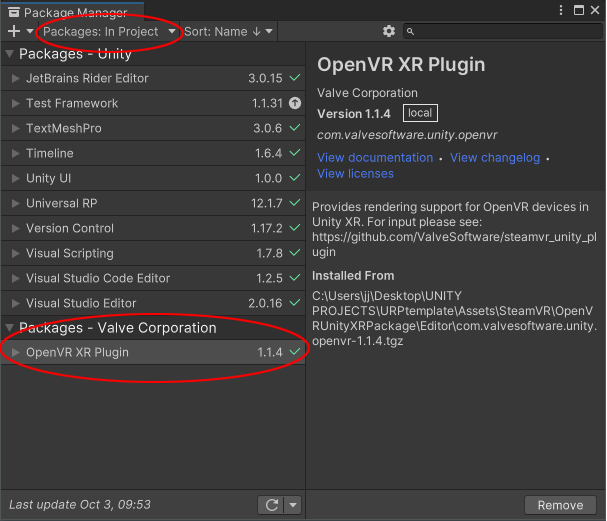
Window->Package Manager
If OpenVR is not installed do this:
Under the +, upper left
Select Add package from tarball...
Locate the com.valvesoftware.unity.openvr-1.1.4.tgz tarball file in your downloads folder
Change to Packages: In Project
OpenVR XR Plugin was installed
(Remove any extra XR packages you might of accidentally installed.)
You can see what the file installed by opening Edit->Project Settings
XR Plug-in Management
Initialize XR on Startup is selected
OpenVR Loader is selected
(This is where you may switch to Oculus if you have one, I would try turning off OpenVR Loader.)
Fix Bindings, if you are asked about it
Delete the Assets/SteamVR_Input folder in your project.
Answer yes to generate actions, Save and generate, close window (This will create a folder in Assets called SteamVR_Input)
Make sure the Player is at 0,0,0
Hide the mouse cursor & add an Escape button
Select the Main Camera or an object
Select the Add Component button in the Inspector
Scroll down to New script
Type a name: hide_cursor_escape
Double click the new C# script in your Assets folder
Replace entire script with this script:
using System.Collections;
using System.Collections.Generic;
using UnityEngine;
public class hide_cursor_escape : MonoBehaviour
{
// Use this for initialization
void Start()
{
Cursor.visible = false;
}
// Update is called once per frame
void Update()
{
if (Input.GetKeyDown(KeyCode.Escape))
{
Application.Quit();
}
}
}
SteamVR Setup
Equipment Setup
Press the power button to turn on the Vive Link Box
Unplug the Controllers from the USB cables
Move the Headset
Steam VR software
Start up Steam Game browser. 
You will need to create an account and install an app on your phone to verify the account.
Using the App, find Steam Guard in order to get a code.
Start the SteamVR program by clicking on the VR in the upper right corner.
(You can close the Community windows)
Or open SteamVR from the Start Menu  once you are setup. once you are setup.

Testing the Vive
Turn on the controllers by pressing both small round buttons for a couple seconds, you will hear a beep.
Put on the Headset
You should see the SteamVR library or use the controllers to launch the simulation.
If the floor matches the real floor it is good to go, otherwise run Room Setup below.
Room Setup and Chaperone
Open SteamVR from the TaskBar 
Select Menu 
Select Room Setup
Select Room-Scale
Make sure the Headset Controllers and Base Stations are visible in the menu.
Click NEXT
Pull the trigger on a controller while pointing at the monitor
Place both controllers on the floor flat side down
Create some boundaries, select Advanced Mode
Click each corner of the room
Select Menu 
Select Settings
Select Play Area->Chaperone style FLOOR ONLY
Slide the Color to the right (no color)
Slide Transparency to the left, (transparent)
If the Vive VR is not working
Turn on the control box power button.
Make sure the headset and controllers are connected
Try wiggling the Headset and pressing the buttons on the controllers
Make sure the hand held controllers have charged batteries
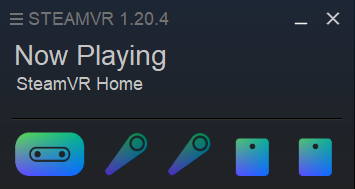
Steam Status Utility will look like the image above if it is ready.
Reset Steam if you don't see all the icons
Under the Menu icon 
Select Devices->Restart headset
Run your Game
Hit the Play Arrow, you should see your game through the headset. 
Publish to a Stand-Alone Unity Player
File->Build Settings...
Select PC, Mac & Linux Standalone
Select Switch Platform
Select Build And Run
Locate your Publish folder (or make one)
Make a new folder that matches your Project folder name
Use Esc or Alt F4 to quit the player. You will restart it later.
Quit Unity, try viewing the game through the stand-alone player you just made.
Use OBS to capture your screen.
|