| |
Live
Action and Underwater Footage |
|
 |
|
Acting in 10 feet of water...
When coming
up with an idea for a short film, I was thinking hard about
the visuals...how would I make this visually interesting, and
push me as a new filmmaker. The thought came to film people
underwater and use the effect of flowing hair and clothes and
the unusual look of moving underwater. Really, the "story"
that became Lost Springs began here.
First, we
needed a body of water to film in. We looked into Hollywood
style water tanks. There is one on the Universal backlot, but
we wouldn't have access to it. In doing a bit of research we
found that parts of Titanic and The Rock were
filmed in a tank in Escondido, CA (San Diego county), the Offshore
Model Basin. I am from San Diego and it would've been close,
and amazing to use, but we didn't have the money or credibility
to work there. So, that was a no-go. But Patrick (actor in Lost
Springs) had a pool in his backyard, and it happened to be 10
feet deep. A standard 6 ft deep pool wouldn't cut it, but this
extra depth would allow us to use a greenscreen and give room
for movement. We had our location.
This was
the only portion to involve actors, so despite their acting
below the surface they would need to look the part. Again, we
didn't have much money, so I hit up an awesome thrift store
in Burbank, CA. The
American Way thrift store is dirt cheap, plus they have
daily specials that make it even better. I bought all the costumes
(including shoes, hats, belts, and suspenders) for under 80
bucks.
Next we
would need the green screen that would help (though certainly
not perfect) the matting of the actors for compositing later.
I bought 30 feet of bright green polyester fabric, and my mom
sewed it to a 10 feet x 15 feet screen. This was stretched over
a PVC pipe frame made of four 10 foot sections, two 5 foot sections,
elbow connectors and sections cut in half to lock the screen
to the pipes.
The location
was ready to go, now all we needed was a way of recording all
the events we'd stage in the water. We'd need an underwater
camera. The first resource we found was Hydroflex,
a Hollywood resource for underwater filming equiptment. They
even offered student discounts. But the bill would've come to
over $500. Next plan. I found that Gates
Housing was based in San Diego (about 35 miles from my house),
gave them a call, and with studen discounts and some great kindness,
got me a professional housing
for an XL1s for $150 for the weekend, let me pick it up
locally, and showed me how it worked. I got ahold of a Canon
XL1s from a friend, and we were ready to go.
All the
underwater portions were shot in the span of 5 hours on a Saturday
in April. We had hoped to get a wide variety of actors by that
time (flyers at CSUSM) but no one replied. There was Jacob,
Patrick and myself. Not enough to populate a town, and apparently
it would've been a town of all men. I managed to talk my sister
into helping out, and Patrick got his neighbor Megan to come
over too. There was our cast and crew. I filmed most of the
sequences while they acted, switching with Jacob or my dad when
it was my turn to flail in the deep end. It was exhasting for
everyone as they treaded water in full costumes, then holding
their breath as long as possible while trying to get below the
surface, and then act. Because of this most shots lasted less
than 5 seconds, but I was able to slow them down in post.
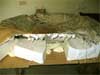
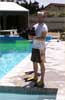 Poolside Photo -- shows me with the underwater camera enclosure
and my filming gear. You can see the greenscreen in the deep
end in the background.
Poolside Photo -- shows me with the underwater camera enclosure
and my filming gear. You can see the greenscreen in the deep
end in the background.
In addition to the underwater footage, interiors were filmed
at Heritage Park in Oceanside. This recreation of an early 20th
century town has been (and remains) closed due to mold. I filmed
through the windows of a home there for the interior with the
husband and wife, and filmed inside the tool barn for the interior
of the barn.
The truck
that I drive through the town at the begining of the short is
parked and rusting in a neighbor's yard. Its an early 30s Ford
that probably hasn't moved in 10 years, but armed with a Canon
GL1 I walked past it, and hand masked it and composited it into
the model in post.
And finally,
the originally story we wrote was about a farmer, who through
a series of cutaways, would be revealed to have survived the
flood by farming up above the town. This is hinted in the final
shot of the short. But, as production time, and running time,
ran thin we had to scrap all but this final shot. I filmed almost
an hours worth of footage of my neighbor, Lyman, on his old
tractor tilling the family field. That concluded the live action
portion of filming, and it would be all Movie Magic from here
on.
|
|
|
| |
Working
with Miniatures |
|
|
|
...or How we spent half a week painting tiny houses...
When brainstorming
ideas, Jacob and I had decided underwater filming would be
cool. Now we needed a story to go with it. It was decided
that we should make a town underwater, telling the aftermath
of a flood that had wiped out the town. The background would
be about the largest water tower ever built, that ultimately
collapsed and crushed the town -- acting also as an allusion
to the stock market crash and depression. This was all fun
to discuss sitting in my kitchen, but it soon became clear
that to build or find a town and flood it just wasn't in our
budget. We were going to composite the actors in anyway. The
conclusion: build a miniature town.
The first
step was to choose a scale, since I was limited to the space
of my apt. in Los Angeles, but also didn't want to be working
on houses too small to have detail and realism. I hit up our
#1 resource when it came to building this model: Allied
Model Trains in Culver City. Comparing the various structure
sizes, I chose HO scale for its detail level, and because
it was a popular size and there were many period buildings
we could use.
I figured
the set would be roughly 4 feet x 4 feet, I set up a couple
of sturdy tables, and covered the tops with cardboard. I had
a few chunks of styrofoam so I placed them in a ring to give
some shape to the ring of hills around the town. I thought
of using spray foam insulation to construct the hills and
give them an organic feel, but after two cans of the stuff,
I barely had a bead to run the circumference. The budget just
wouldn't allow for 50 cans, so I decided to go the old standard
-- paper mache. About 4 hrs of placing glue and water soaked
strips of the Los Angeles Times over the chicken wire, letting
it dry, and repeating the whole process, the valley was begining
to take shape. To cover the newsprint, I stumbled upon a "sandstone"
spray paint used for crafts and home decor at Home Depot,
it happened to have a nice terra cotta color, and an awesome
grittiness that textured the surface like dirt. Adding a mix
of fine yellow grass ground cover (model RR), actual dirt
from my house, and course light green ground cover, the ground
work was done. Adding a few trees and bushes, and tall wild
grass sheets, the "natural" environment was ready
for civilization to move in.
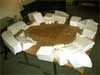 The
ealiest stage of the model, roughed in cardboard, styrofoam,
spray foam, and chicken wire. The
ealiest stage of the model, roughed in cardboard, styrofoam,
spray foam, and chicken wire.
 The
paper mache skin complete, it was time to spray paint it.
I used a terra-cotta-colored faux sandstone spray. The
paper mache skin complete, it was time to spray paint it.
I used a terra-cotta-colored faux sandstone spray.
 Painted
and dusted with ground cover, the model looked less like a
science project, and more like a valley. Painted
and dusted with ground cover, the model looked less like a
science project, and more like a valley.
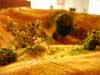 Model
trees and green foliage made the valley all the more real. Model
trees and green foliage made the valley all the more real.
Once the topography was done, it was time for the most tedious
and meticulous portion of the model -- the buildings. We went
to Allied Model Train and bought $150 worth of miniature buildings,
mostly small shacks, but also a main diner, barn, stretch
of city buildings, and a windmill. With the addition of model
glue and some cheap acrylic paints, we set to work putting
the structures together, and then painting them down to the
smallest detail we could muster. Over the span of 4 days we
worked morning to night making these things as realistic as
possible. One hint, to make quick details when the models
are cast with detail, is to paint a base coat of the material,
and wash with dark paint, and then with light. The paint fills
the details and brings them out with little work. We refered
to this process as "sh*tying it up". One of use
would paint the base coat, and the other would sh*ty it up
with a wash. Once they were all done, I placed them in the
model and dusted the whole thing with dirt, to give it a sense
of age and to give a feeling of connectedness between the
different structures.
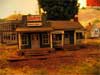
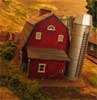 The
barn would be the most prominent building in the town. The
barn would be the most prominent building in the town.
 By
far the most complex structure, the diner took almost a day
to make and paint. By
far the most complex structure, the diner took almost a day
to make and paint.
 Though
not featured much in the short, I made miniature signs for
the service shop. We also had to make the roof ourselves as
it wasnt included in the kit. Though
not featured much in the short, I made miniature signs for
the service shop. We also had to make the roof ourselves as
it wasnt included in the kit.
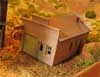
 Four
homes were built, and became shanty row. These took an huge
ammount of time despite thier relative simplicity. Just the
assembly was a task. Four
homes were built, and became shanty row. These took an huge
ammount of time despite thier relative simplicity. Just the
assembly was a task.
The finished
model took aproximately a week and a half to construct, devoting
all my time, and 3 days worth of Jacob's. I hung dark blue
sheets from the ceiling around the entire perimeter of the
model, so cut out all the room, and lit the model as best
I could from a track light and a halogen flood on the floor.
The plan was originally to cut out the blue screen and add
sky, but it was just one of the many elements that were thrown
out due to time. Most people don't notice the sheets, and
once it was done I enjoyed the hand made look that they added
to the model.
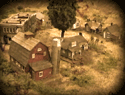
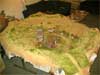
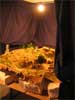 The
finished model, ready for filming. The filming was done with
my very old JVC GRDVM5 camera that I've had since '97. I had
constructed a miniature security camera on an inverted tripod,
but scrapped it for the autofocusing and small JVC. The
finished model, ready for filming. The filming was done with
my very old JVC GRDVM5 camera that I've had since '97. I had
constructed a miniature security camera on an inverted tripod,
but scrapped it for the autofocusing and small JVC.
|
|
|
| |
Compositing
and Digital Effects |
|
|
|
120 Hours can fly by when you're matting by hand...
To get
a sense of what the footage looked like when I captured it
and set to compositing, check these out:
LOST
SPRINGS ROUGH SEQUENCES
(behind the scenes videos)
It
all took place in Adobe After Effects, the program that I've
used more than anything else as a video filmmaker. My aids
in this complex task would be the following plug-ins:
- Keylight
-- a keying plug-in that works wonders with removing greenscreen.
It gives you complete control of the matte you make, and
a great feature of simple black and white status showing
what is going to be transparent and what will remain.
- Twixtor
-- a time control plug-in, it does an amazing job of slowing
video through various forms of morphing between frames.
The result is a super smooth slow down.
- Cinelook
-- a plug-in that adds film-like qualities to video such
as grain, dirt and scratches, film stock, and color toning.
It also alters frame time to look more like 24fps.
Though
these plug-ins helped me achieve effects I wouldn't have been
able to accomplish otherwise, they couldn't do everything.
The number one issue I faced from the footage was trying to
key out the underwater greenscreen. Going into this project,
I had checked out Hydrolfex's How-To of underwater greenscreening,
and found that to do it right would've been costlier than
anything I could manage. So I know I'd have to do it the wrong
way, and make up for it in post (never a wise choice). This
meant hours and hours and days and even weeks of creating
hand-mattes in After Effects using keyframed masks.
The process
was as follows:
- Take
the raw underwater footage and bump up the contrast to give
the cleanest green screen to foreground difference. The
water got murkier and murkier, and Keylight didn't like
the interference. The results from Keylight was that everything
was slightly transparent, as the water and particles picked
up the green. So I had to drop the strength of the key enough
that the foreground actors were fully opaque.
- After
Keylight, the screen area was only partially transparent
and there were the matters of arms and legs moving outside
the screen area. This would all have to be cleaned up by
hand. I created a mask (or multiple masks for complex areas)
and keyframed them along with the movement of the people.
Most were flailing so it meant changing the shape of the
mask for just about each frame. Depending on the situation,
some masks were very simple and polyogonal, while others
had many points and moving them was tough.
- At
this point the actors were isolated. But most of the actors
only lasted a few seconds before they broke "character"
and went for air. This is where Twixtor came in. Applying
the plugin to the already matted footage, I was able to
stretch those sequences to 3x what they were (also stretching
my masking 3x, and making it look more fluid). This killed
render time, but I wouldn't have been able to use characters
on screen for as long as I needed them any other way.
- Placing
this slowed, matted footage over the runthrough of the model,
I used After Effects motion tracker feature to track various
points in the model for individual characters. These tracked
points were linked to the position of the actor footage
using equations that link to the tracker position.
Once all
the actors' footage was linked to the run through, It was
merely a matter of filtering the result with a vignetting
mask, film grain, adding a masked layer of water texture over
blue for the final reveal of the flood, and add the credits.
The credits involved a underlying layer of slowed light through
water, on top of which was roughly composited the actors jumping
into the pool, with a layer of text on top and a simple ripple
effect (built into After Effects) to make it wave. The transition
into and out of the text was a directionlly blurred version
of the text with the opacity "wiggled" with After
Effect's Wiggler.
|
|
|
| |
Music |
|
|
|
In Memory of Greg Hale Jones
I added
this final section, because the music plays such an essential
role in the mood, the timing, and the success of the short.
The story behind the song that made Lost Springs what it is
stems back to Jacob passing along a song that he liked he
had found on the internet.
The song
is called Boll Weevil, and was created by Greg
Hale Jones, a composer who contributed to a number of
films, including the Genera'ls Daughter. This particular song
had an awesome feel and what actually what inspired the concept
of a ruined Depresion-era town. You can still download
it here.
I contacted
Mr. Jones via email, told him about the concept (nothing had
been filmed or even storyboarded), and asked for permission
to use the song. He replied with the following email:
Hello
Nick-
I would be delighted for you to use the song gratis in the
short. You don't have to file any paperwork! All I ask is
the following credit:
Music:
Boll Weevil
from "Crossing The Willamette" by Greg Hale Jones
© 2002 Greg Hale Jones/Exoteric Music (ASCAP)
Used
by Permission
***
That's it. Your short sounds very interesting (really!)-
let me know how it turns out.
Best,
Greg
ps
If you get into a longer film at a future time, and you
want a score, write me and we'll talk it over. I like to
do indies, especially when they're challenging and different,
which sounds like what you're doing.
With his
permission I was able to use the song, and use it during editing
for timing and inspiration. As the film came to a close, I
realized how essential the music had become to the viewing
of the film.
Upon completion,
I sent him a copy of the film, to which he replied:
Hello
Nick-
What
a pleasure it was to receive "Lost Springs." I'm
getting interviewed by Scott Alarik of the Boston Globe
tomorrow about what he calls "neo-primitivism,"
in music and I would like to send him my copy. "Lost
Springs" seems like a hand-in-hand member of this folk-digital
genre with "Boll Weevil."
My partner
Laurie and I watched the film with great delight. The fact
that the characters are floating only becomes evident gradually
(subliminally? What are those reflections on his arms?),
then dawns on you and all the elements of the piece suddenly
lock together in just the way fine art should. The title,
subject, meaning, characters, all are there for a solid
reason and nothing is gratuitous.
And
it's beautiful to look at. We also devoured "Fleurs"
and I about died when that dreaming man slowly, gently began
to burn.
Nick, I think you are headed for great things.
If you
can send me a few more copies of the DVD (great packaging
and features, BTW) I would like to share them with some
people (in addition to Scott).
All
the best,
Greg
I was
glad that Mr. Jones had enjoyed the film, and excited to discover
a title that I might one day call my style. But that was the
last message from Mr. Jones. Greg Jones passed on July 22,
2004. From what I heard from him, he was a very kind man,
and I'll always appreciate his work through which he will
live on.
|
|
|
|
|
|
BEHIND
THE SCENES:
There
were 4 main elements that went into the making of this film
Underwater
Filming
Miniature Model
DigitalCompositing
Music
Each is
detailed in a section to the left.
Also,
check out this BEHIND THE SCENES FOOTAGE:
|
|