|
Install Steam on Your Own Computer
Download Vive compatibility check ViveCheck.exe, Macs will not work. This is not always true for PCs.
Do not disconnect the Vive setups in the classroom. You may checkout a Vive headset from the checkout for use at school.
Install this software so you can possibly connect a VR headset to your computer. Although VR will run on computers the software warns about.
Download from: https://store.steampowered.com/about
Install Steam button.
Run SteamSetup.exe from your downloads folder to install software.
Accept license agreement
Start Steam 
First time use, Steam will ask you to login, setup an account
And it will verify from a Steam Guard App you need to install the App on your phone.
Believe it or not more software gets installed, this time SteamVR.
Setup
Start up Steam, you will need the Vive equipment connected for this section.
Start the SteamVR program by clicking on the VR in the upper right corner.
(You can close the Community window)

If the Controllers are not being seen by the Base Stations, Select Pair Controller from the Controllers menu under the controller icon.
Testing the Vive
Put on Headset
Use the controllers to launch the SteamVR library simulation
Room Setup and Chaperone
Open SteamVR from the TaskBar 
Place the headset on the floor, near your chair
Select Menu 
Select Developer->Developer Settings
Change Room and Tracking to Medium Space
Hit Quick Calibrate
(The Room Setup utility adds Chaperone boundaries you can not get rid of.)
Select Menu 
Select Settings
Select Play Area->Chaperone style FLOOR ONLY
Slide the Color to the right (no color)
Slide Transparency to the left, (transparent)
If the Vive VR is not working
Your SteamVR Player should be at 0,0,0 in Unity
Make sure the headset and controllers are connected
Try wiggling the Headset and pressing the buttons on the controllers
Make sure the hand held controllers have charged batteries
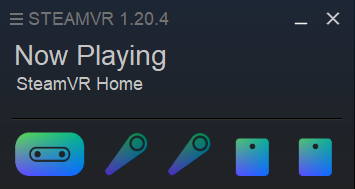
Steam Status Utility will look like the image above if it is ready.
Reset Steam if you don't see all the icons
Under the Menu icon 
Select Devices->Restart headset
Base Station Trouble Shooting
Make sure each base station is in the correct mode for syncing
Press the mode button on the back of one base station.
The readout on the front is b Press the mode button of the other base station until the readout on the front is c
It doesn't matter which base station is in which mode, as long as one is b and one is c
Look at base station LEDs and make sure they are solid.
If the LED is blue, it is still spinning up and waiting to stabilize.
If it never changes from blue, check to make sure the base is mounted securely. Vibrations can cause it to be stuck in this state.
If the LED is slowly blinking white, it's in standby mode.
Try unplugging and replugging the base station to fix this.
If the LED is solid or blinking purple, the base stations are having trouble seeing each other. Make sure nothing is in the way.
Headset Issues, bad graphics
Reset the Vive System
Let's check if these are the steps:
1. Quit SteamVR and any other Vive/VR apps running on your PC.
2. Unplug the power cable from the side of the link box that's feeding into the headset.
3. Hold down the button on the left side of the Vive headset, and continue to hold it down as you plug the cable back into the link box – keep holding the button for up to 15 seconds after plugging that cable back in.
4. After releasing the button, the Vive should get snapped out of its semi-bricked state.
5. After that, install any available firmware updates. (Before you update the firmware disconnect any other unneeded USB device from the PC.
Tutorials Etc from Steam
https://valvesoftware.github.io/steamvr_unity_plugin/tutorials/SteamVR-Input.html
Please note, these only work up to Unity 2019.1. Very sad.
|