|
Install Software
For assistance if you are having difficulties with the install, please contact Israel Gutierrez: issag@arts.ucla.edu
Login to the DMA Cloud
Go to the https://cloud.dma.ucla.edu website and login with your DMA username and password.
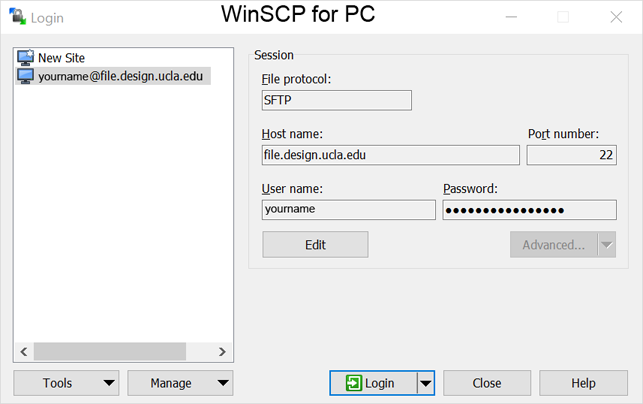
You may also use an SFTP program file.dma.ucla.edu port 22 /data/export/renders
Download Two Files
Open the Deadline Renders folder. (The cloud remembers the last folder you were in, hit Home button.)
Open the DeadlineClientInstallers folder
Select the Deadline10RemoteClient.pfx file click Actions and download it. (Look in Downloads folder.)
Move this file to a place on your computer where it will not move or get deleted.
This certificate is always required to connect to Deadline.
Select an installer from the same folder and download it:
Mac: Select and download the .dmg file
Windows: Select and download the .exe file
(Ignore the pfx file, this is not for DMA, it is generic.)
Install the Deadline Client Installer Software
Extract then Double click the DeadlineClient-installer for your computer OS. (in downloads)
Mac: Open System Preferences->Security & Privacy->General tab Select Open Anyway
Installation Directory window
Use the default Installation Directory.
Select Installation Type window
Select Client
Deadline Setup window
Select [Recommended] Remote Connection Server
Deadline Setup window
Input this Server Address render.dma.ucla.edu:4433
Deadline Setup window
Click the button next to RCS TLS Certificate 
Select the Deadline10RemoteClient.pfx file you moved to a safe location.
DO NOT input a Certificate Password.
Mac: Deadline Client Setup window
Select No License
Deadline Launcher Setup window
Uncheck Launch Worker When Launcher Starts
Block Auto Update Override window
Keep Block auto upgrade via a secure setting. (Recommended)
Setup
Setup Your Local Render Folders
Make a folder on your Desktop named Deadline Renders.
Make a folder under Deadline Renders with your DMA username.
Make 2 folders in the username folder: scenes and images.
Setup Your Remote Cloud Render Folders
Navigate to the Deadline Renders folder on the DMA server.
Use the + button in order to to create a folder with your DMA username as the folder name.
Use the + button in order to to add two New Folders inside your folder: scenes and images.
(This should match your desktop folders.)
++++++++++++++++++++++++++++++++++++++++++++++++++++++++++++++++++++++++++
In Maya
Render Settings
Render Settings icon upper right  (Windows->Rendering Editors->Render Settings...) (Windows->Rendering Editors->Render Settings...)
Change Render Using to Arnold Renderer (Arnold is the default)
Under the Common tab:
Choose Image format: tif
Uncheck Dither
Change Frame/Animation ext: to name.#.ext
Input the Start frame and End frame range
Input your Image Width and Height
Faster render settings, with transparency for tests.
Under the Arnold Renderer tab:
Under the Sampling arrow:
Set Camera (AA) to 3 (default 3)
Set Diffuse to 2 (default 2)
Set Specular to 1 (default 2)
Set Transmission to 0 (default 2)
Set SSS to 0 (default 2)
Set Volume Indirect to 0 (default 2)
Under the Ray Depth arrow
Set Total to 4 (default 10)
Set Diffuse to 1 (default 1)
Set Specular to 1 (default 1)
Set Transmission to 0 (default 8)
Set Volume to 0 (default 0)
Set Transparency Depth to 4 (default 10)
DEADLINE Renderfarm File Setup
Local File
Place a copy of your Maya scene file in the Desktop\Deadline Renders\yourname\scenes folder.
Remote Cloud Files
Login to the https://cloud.dma.ucla.edu website.
Navigate to Deadline Renders\yourname\scenes
Use the + button in order to to upload these files:
Place any texture files and the scene file into the scenes folder. (do not use subfolders)
(Advanced: cached files can go there too.)
Use Deadline Monitor
Run Thinkbox->Deadline Monitor 10
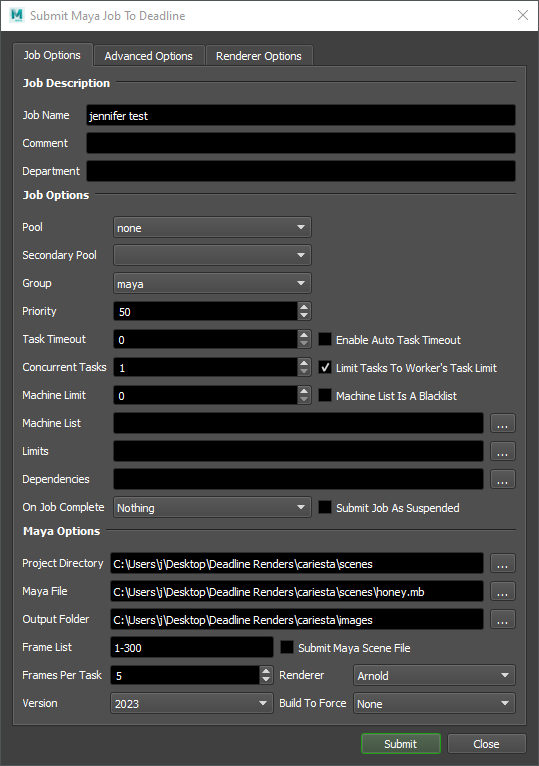
Select Submit->3D->Maya
Fill in
Job Name something descriptive, include your name
Group maya
Machine List Select the Falcon Talons and Alienware computer, you can skip this
Project Directory Select your Desktop
Maya File Select your Maya .mb or .ma file from local scenes
Output folder Select your local images folder
Frame List 1-300 etc
Frames per Task 5
Renderer Arnold
Version 2023
Hit Submit, answer yes a lot, do not worry about the question about local.
You can close the window.

Render Issues
If the files are not rendering to your image folder, even though it looks like it is working, stop the job and use WinSCP or Filezilla to change the permissions of your render folder to 0777.
DMA Cloud to download Render Files
Download the images directory from the cloud when you are finished.
Go to the https://cloud.dma.ucla.edu website and login with your DMA username and password.
When you view the images folder after the render, you should run Refresh in order to see the files.
Please delete your files off the cloud once you have them.
PC View the Animation with fcheck
PC: Use Windows Start Menu (lower left)->Autodesk->fcheck from windows
(or C:\Program Files\Autodesk\Maya2022\bin\fcheck.exe)
Select File->Open Animation Find the files in your project area, Select the first frame.
Mac View the Animation with After Effects or Premiere
Mac: Use After Effects then Media Encoder, or Premiere Pro.
Or use SFTP to download Render files
This might be easier than using the cloud, no zip files
Mac use Filezilla,
PC use WinSCP
Host: file.design.ucla.edu port 22
User ID: Your login
Navigate to /data/export/renders/yourname/
Under your name you should have an images and a scenes folder
When you view the images folder after the render, you should run Refresh in order to see the files.
Change the permissions of your image folders to R W X (777) if you use SFTP to create folders.

You may want to skip this...
Nextcloud sync a DMA Cloud folder to a folder on your computer.
Do this after setting up your project on the cloud. This will make it easier to use the cloud, no zip files
You will sync your cloud.dma.ucla.edu Deadline Renders/images folder to your local Desktop/Deadline Renders/yourname/images folder. It is a two-way sync, files update automatically on both ends.
Install Software
Download the software for your computer: https://nextcloud.com/install/#install-clients
Double click the Nextcloud installer from your Downloads folder
Useless Wizard
For first time users, Nextcloud connection wizard should appear.
Close the Wizard (It does not remember what you set!)
First time Setup
ADD ACCOUNT
Start the Nextcloud utility
Mac: Nextcloud is accessible through the green circle with a checkmark icon top right menu.
Select Add account before launching program.
PC: NextCloud is the green circle with a checkmark icon in the lower right menu
Select Add account before launching program.
Select Log in to your Nextcloud
Type Server Address: https://cloud.dma.ucla.edu (Click in the start of the field and type.)
Click Next>
If asked, select Trust this certificate anyway
Select Log in
Grant access to your computer
Close the browser, close the wizard
Configure Connections
SETTINGS
Start the Nextcloud utility
Mac: Nextcloud is accessible through the green circle with a checkmark icon top right menu.
Select Settings before launching program.
PC: NextCloud is the green circle with a checkmark icon in the lower right menu
Select Settings before launching program.
Select your name in the upper left
Local Folder
Select Add Folder Sync Connection
Select the Local Folder on your Desktop to sync, Desktop\Deadline Renders\yourname\images
Click Next
Remote Folder
Open Deadline Renders folder->yourname
Select images folder
Click Next
Click Add Sync Connection
GENERAL
Select the General section
Uncheck Ask for confirmation before synchronizing folders larger than 500 MB
Next time you use Deadline, the files will automatically move to your computer as they are being rendered.
Compare the file sizes to make sure all the files were able to sync. You may need to move a few manually.

|