|
Publish WebGL for Browsers on the Internet and phone
Prebuilt SteamVR Project with Universal Rendering Pipeline
You may already have this...
Download this 2021 scene, move the folder to your Desktop or working area.
This file is already setup with SteamVR and some other tools.
https://classes.dma.ucla.edu/Fall22/156/projects/URPtemplate.zip
Change the greggman Better2020 Startup Logo
Change the startup screen logo.
Use Photoshop and open logo.png from:
URPtemplate\Assets\WebGLTemplates\Better2020
In Unity
WebGL Publish
Select File->Build Settings...
Select WebGL
Select Switch Platform
Close Build Settings window
(If you do not see the WebGL option, you will need to add the module with the Unity Hub.)
Fix Some Issues (some are already fixed in the template):
Fix SteamVR Newton script
Under the Project tab select Assets/SteamVR/Input/Plugins/JSON.NET/Valve.Newtonsoft.Json.dll
(search for Newton)
In the Inspector put a check mark next to WebGL
Hit Apply
Remove OpenVR XR Plugin (This runs VR Headset etc)
Select Window->Package Manager
Select Packages: In Project
Select OpenVR XR Plugin, Hit Remove
(You may reinstall for VR later, see bottom of page, orange section)
File->Build Settings...
Select Player Settings... button (This is the same as Edit->Project Settings...)
Select Player Section
Under Resolution and Presentation
Select Better2020
Under Other Settings
Select Color Space to Gamma (default Linear)
Change Lightmap Encoding to Normal Quality (default High Quality)
Under Publishing Settings
Change Compression Format to Disabled (default brotli)
Close Project Settings
PC:
File->Build Settings... (This should still be open)
Select Build and Run
Create a New Folder outside of your Unity project
Name the folder something similar to the project, yourname_project + _player
Select and Save to the folder...
Mac:
Select File->Build Settings... (This should still be open)
Select Build and Run
Select a location outside your project.
Save As: Name it something similar to the project, yourname_project + _player
A folder will be created for you.
The webGL will pop up in a browser. You can now publish to the project folder to the class server
MAC WebGL Bug, magic spell: If your project is not visible in a browser, save your project, quit Unity, reopen the project and publish one more time using Build and Run.
Mac Issue: If your project does not publish and you are using an external hard drive, you will need to move all your files to your main drive and publish to the main drive.
::::::::::::::::::::::::::::::::::::::::::::::::::::::::::::::::::::::::::::::::::::::::::::::::::::::::::::::::::::


Publish to class website
You can test publish your site through the class folders.
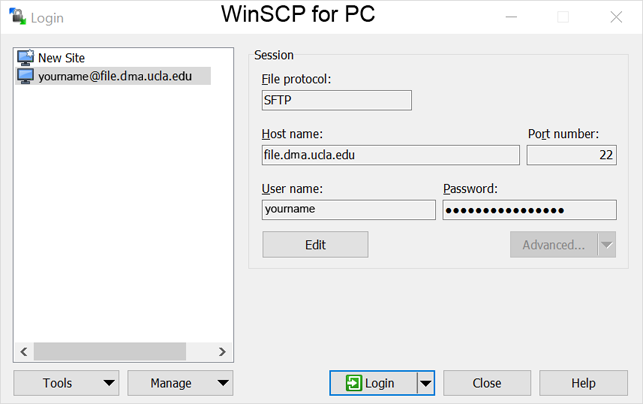
Mac use Filezilla, PC use WinSCP to transfer
Host or Host name: file.dma.ucla.edu
Port number: 22
User name: Your UCLA login
By default WinSCP and Filezilla start at your home directory /home/users/yourname
Select the link to myClasses
Select the link to F22-156 AKA /data/classes/Fall22/156
Select web AKA /data/classes/web/Fall22/156
Select projects
Select the correct assignment folder such as Exercise_A_primitives_webGL
Upload the yourname_player you created for the publish, this includes an index.html and Build folder.
Or Login to the DMA Cloud
Go to the https://cloud.dma.ucla.edu website and login with your DMA username and password.
Select file.DMA Home
Select myClasses
Select W22-156
Select web
Select projects
Drag your webGL publish folder into the correct assignment folder
Website link to folder for the class
https://classes.dma.ucla.edu/Fall22/156/projects
Prior 156 Classes that used webGL
https://classes.dma.ucla.edu/Winter22/156/projects
https://classes.dma.ucla.edu/Winter21/156/projects
https://classes.dma.ucla.edu/Fall20/156-1/projects
https://classes.dma.ucla.edu/Winter20/156/projects
::::::::::::::::::::::::::::::::::::::::::::::::::::::::::::::::::::::::::::::::::::::::::::::::::::::::::::::::::::
ADVANCED modify the GUI text Overlay
Modify the directions for interaction:
Modify the Message
Edit the script FallbackCameraController SteamVR->InteractionSystem->Scripts
Carefully replace each line of text between the "" under the if ( showInstructions ) section at the bottom of the script.
Change the Font
Make a new folder in Assets called Resources
PC: Copy a font from C:\Windows\Fonts into resources
Mac: Copy a font from Macintosh HD/System/Library/Fonts into Resources, look at the name in the assets for spelling
Edit the script FallbackCameraController SteamVR->InteractionSystem->Scripts
Replace all the text between the { } for if ( showInstructions ) section
Change the fontname to your selected font
GUIStyle myButtonStyle = new GUIStyle();
myButtonStyle.fontSize = 18;
//create a folder in Assets called Resources, put a font in there
Font myFont = (Font)Resources.Load("fontname", typeof(Font));
myButtonStyle.font = myFont;
myButtonStyle.normal.textColor = Color.white;
myButtonStyle.hover.textColor = Color.white;
GUI.Label(new Rect(5.0f, 5.0f, 600.0f, 400.0f),
"WASD EQ/Arrow Keys to translate the camera\n" +
"Right mouse click to rotate the camera\n" +
"Left mouse click for standard interactions.\n", myButtonStyle);
::::::::::::::::::::::::::::::::::::::::::::::::::::::::::::::::::::::::::::::::::::::::::::::::::::::::::::::::::::
Later install OpenVR XR Plugin to run a VR Headset
This plugin interferes with WebGL publish and the Mac simulator.
Select File->Build Settings...
Select Windows, Mac, Linux
Select Switch Platform
Window->Package Manager
Under the +, upper left
Select Add package from tarball...
Locate the com.valvesoftware.unity.openvr-1.1.4.tgz tarball file in your downloads folder
Change to Packages: In Project
OpenVR XR Plugin was installed
Fix Bindings, if it is a problem
Delete the Assets/SteamVR_Input folder in your project.
Make sure the Player is at 0,0,0
|