|
Animate a Bouncing Ball
Change the velocity between keyframes
Animating an object is similar to animating the camera, move the Time Slider, move the object, select the channels and set keyframes.
Set up your Maya environment for animation:
Move the Time Slider over to frame 1 at the bottom of the screen.

Change 24 fps to 30 fps over to the right on the Time Slider.

The maximum playback on the Time Slider is 30, over to the right on the Time Slider.

Set Keyframe 1
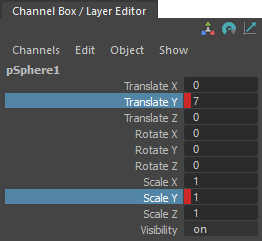
Place a poly sphere above the origin (0 7 0), use the front view.
Select the sphere.
Move the Time Slider over to frame 1 at the bottom of the screen.
Hold down the Ctrl key while highlighting the words Translate Y, Scale Y in the Channel Box
On a Mac use the Apple key.
Use the right mouse key over the channel names, choose Key Selected.
Set Keyframe 15
Move the Time Slider over to frame 15.
Move the sphere down a little past the ground.
Select the Scale Tool button from the side tool box. 
Click and drag on the green box to scale down the y axis smaller. This will give the sphere a volumetric squish when it impacts the ground.
Hold down the Ctrl key while highlighting Translate Y, Scale Y in the Channel Box
On a Mac use the Apple key.
Use the right mouse key over the channel names, choose Key Selected.

Set Keyframe 30
Move the Time Slider over to frame 1. (Yes frame 1)
Use the middle mouse key to slide the Time Slider over to frame 30, notice when you use the middle key the animation does not move, this will let us set frame 30 the same as frame 1.
Hold down the Ctrl key while highlighting Translate Y, Scale Y in the Channel Box
Mac use the Apple key.
Use the right mouse key over the channel names, choose Key Selected.
Preview the animation
Select the front view.
Hit the play arrow on the Time Slider. 
Stop the playback by clicking the mouse on the red square over the play arrow.
Right mouse over the Time Slider
Select Playback Speed->Play Every Frame, Max Real-Time
Hit the play arrow on the Time Slider again. 
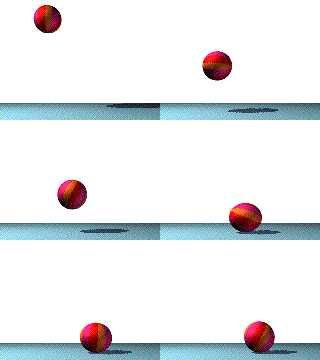
You should notice a few problems with your animation. The ball squishes before it hits the ground. The falling does not feel like a ball bouncing with the pull of gravity.
Fix the ball from squishing before it hits the ground
Select the Sphere
Move the Time Slider over to frame 1.
Use the middle mouse key to slide the Time Slider over to frame 14.
(When you move the Time Slider with the middle mouse button, there is no change.)
Highlight Scale Y in the Channel Box. (Do not highlight Translate Y this time!)
Use the right mouse key over the the Scale Y channel name, choose Key Selected.
Preview the animation again.
Add the Feeling of Gravity and Edit the Graph Editor
Select the Sphere
Windows->Animation Editors->Graph Editor
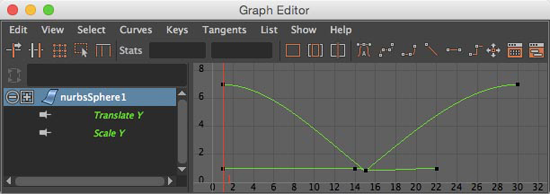
Time is horizontal and value is vertical.
Click and drag a box to highlight all the curves. They should appear white.
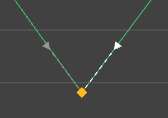
Select Tangents->Flat or use this button  to change the shape of the curves, notice the tangent handles are horizontal. This will give you an ease in, ease out feeling. (The curves may have been set to Auto tangency by default, this may be similar to flat.) to change the shape of the curves, notice the tangent handles are horizontal. This will give you an ease in, ease out feeling. (The curves may have been set to Auto tangency by default, this may be similar to flat.)
Fix the move in Y curve
Highlight Translate Y over on the left of the Graph Editor, this will select the sphere moving in Y channel only.
Select keyframe 15 in the middle of the curve.
Click the Break Tangents button. 
This lets you move each tangent separate from each other.
Select the Move Tool button from the the tool box on the left. 
Marquee select over the left tangent for keyframe 15, (Select the keyframe first to see the tangent handle), move the tangent until it looks like this.
Do the same for the right tangent.

Playback the animation, the ball should have a feeling of gravity, it speeds up as it falls.

Fix the scale curves
Highlight Scale Y over on the left of the Graph Editor
Click and drag a box over keyframe 30
Select the Move Tool button from the side tool box above.  (Not in the graph editor) (Not in the graph editor)
Time snap button on the Graph Editor should be selected by default. You may need to make the graph editor window larger to see it. 
Hold down shift while dragging keyframe 30 horizontally to keyframe 20.
(This will make the ball appear to snap back into shape quicker, less like a water balloon, more like a rubber ball.)
Type an expression to create volumetric squashing
This expression will not work in Unity.
In the Channel Box:
Highlight Scale X, Choose Edit->Expressions... in the Channel Box menu.
Input the following under Expression:
sx = 1/sy ;
sz = sx;
Click Create.
The scale in X and Z will be effected by any scaling in Y.
Add a Directional Light
Create->Lights->Directional Light
Increase the Intensity to 1.2 in the Attribute editor or the Hypershade window.
Change the Shadow Color to a dark gray.
Under Arnold
Change the Exposure to 2
Rotate the Directional Light X: -45, Y 45
Render Settings
Press Render Settings icon upper right or middle 
Under the Common tab:
Choose Image format: tif
Uncheck Dither
Choose Frame/Animation ext: name.#.ext
Input Start frame: 1
Input End frame: 30
Under the Image Size
choose 960x540
With these settings below, your scene will render faster with a preview quality.
Under the Arnold Renderer tab:
Under the Sampling arrow:
Set Camera (AA) to 2 (default 3)
Set Diffuse to 2 (default 2)
Set Specular to 1 (default 2)
Set Transmission to 0 (default 2)
Set SSS to 0 (default 2)
Set Volume Indirect to 0 (default 2)
Under Filter arrow
Set Width to 1
Under the Ray Depth arrow
Set Total to 1 (default 10)
Set Diffuse to 1 (default 1)
Set Specular to 1 (default 1)
Set Transmisssion to 0 (default 8)
Set Volume to 0 (default 0)
Set Transparency Depth to 0 (default 10)
Click Close
Render an image to the Arnold Render View
In the persp window menu
Select View->Camera Settings->Resolution Gate
Uncheck View->Camera Settings->Gate Mask
This will let you see how the image will be cropped.
Click the Render View icon upper right 
Click the Start IPR icon 
Save Your Scene
Render an Animation Sequence
Change to the Rendering Module

Select Render->Render Sequence from the top menu bar.
You can always hit the Esc button to stop the render.
Where are the files?
The image is stored locally on your computer or in your external drive project in the images folder.
Local PC: C:\Users\%USERNAME%\Documents\maya\projects\default\images
Local Mac: /users/$user/Documents/maya/projects/default/images
View the Animation
Select File->View Sequence... Select the first frame
Change the frame rate to 30fps
If this does not work (I think this is broken)
On a PC: Open Fcheck from C:\Program Files\Autodesk\Maya2023\bin\fcheck.exe
Make sure the frame rate is set to 30fps
On a Mac You can use Quicktime or VLC to display an image sequence.
Unity
You may save the file into a Unity Assets folder. The Maya expression will not transfer
There is a script for squash and stretch on the Scripts page:

|
