
Alpha Channels and Traveling Mattes - After Effects
In Photoshop:
Add an alpha channel to an all white image:
Window->Show Channels
Select the Alpha channel.
Use the Type Tool to type a word in the alpha channel.
Save the file as a TIFF or PSD.
In After Effects:
Create a composition; select Composition->New Composition.
Set the size to be 360 x 240 pixels
Set the duration to 00:00:02:00 or 60 frames.
Import your Photoshop type image: File->Import File
(Answer OK to the alpha channel question.)
Import a quicktime or AVI movie, there should be some around.
Drag your type on to the Timeline.
Select Window->Motion Sketch, you will use this to interactively animate your type.
Click the Start Capture button
Drag your type around the Comp1 window.
Hit the arrow playback button to see your results.
Set your Time Marker on the Timeline to the first frame.
Drag your quicktime movie on to the Timeline.
Drag it below the type, see diagram below.
Click the Switches/Modes button on the Timeline, it should look like the image below.
Click and hold on the button that reads None across from the movie; switch it to Alpha Matte.
Notice the type channel is automatically unchecked and your movie reads through the type.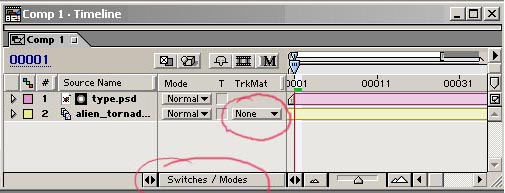
Part 2 Complex Layers
Make another composition: Composition->New Composition
Drag Comp1 from the Project Widow into Comp2 on the Timeline.
Run an effect such as Polar Coordinates on Comp1 in the Timeline.
Notice the type appears to be swimming through the effect. The results would be much different if you rant the effect on the type alone in Comp1.