|
Selection Alpha Channels:
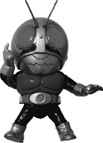
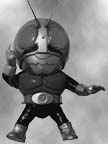
Download this robot and cloud image to your desktop from Netscape.
Click and hold you mouse over the robot image,
Choose Save image as...
Choose the desktop
Click Save
In Photoshop:
Choose File->Open
Choose the desktop
Click the file robot.jpg
Follow the same procedure to open up clouds.jpg.
Stretch the window size of the watch by pulling the
window icon in the lower right corner,
so that you have a larger area to work within.
Use the Magnifying Glass to zoom in on the image. 
(The option key with the Magnifying Glass zooms out.)
Use the Magic Wand Tool 
Use Windows->Show Options
Input Tolerance: 50
Click once to select the background of the robot image.
Hold down Shift and click another region of the background to add this to the selection.
Keep doing this until the entire background is selected.
Shift key + a selection tool such as box, lasso, magic wand, etc.,
adds to the selection.
Option key + a selection tool subtracts from the selection.
Choose Select->Inverse, to select the robt instead of the background.
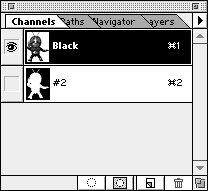
Save the selection to an alpha channel.
Choose Select->Save Selection
Choose Windows->Show Channels
Click the second channel to bring up the alpha channel, you may want to modify it.
Click Black or the first channel to bring you back to the main image.
You may save as many selection channels as you like.
Choose Select None (This deselects the channel.)
Load the alpha selection channel.
Choose Select->Load Selection
Choose Channel: #2 or Alpha 1
Layers:
Choose Edit->Copy (This saves the selected area to a temporary buffer.)
Click on the clouds.jpg image in order to make it active.
Choose Edit->Paste (Paste the robot image into a new layer in the clouds image.)
Choose Windows->Show Layers (Layers is a tab under the Channels tab.)
You can pick separtate layers to paint, perhaps fix the edges.
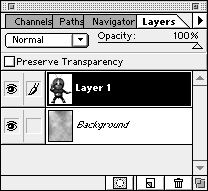
Click the small arrow on the upper right of the Layers window to bring up the menu
Choose Flatten image This will merge the two layers.,
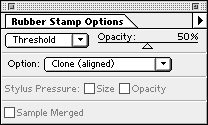
Double Click on the Rubber Stamp Tool to get its dialogue box. 
Input Opacity 50%
Select Clone (aligned)
Select Mode Normal
How to use the Rubber Stamp Tool:
Use the Option Key to select an area to clone.
Let go of the Option Key, start cloning
This will fix the edges of the robot against the cloud background, you may need a small brush.
|