|
In After Effects:
Choose Composition->New Composition
Leave the resolution on full, width 640 x 480, pixel square.
Set the Frame Rate to 30 fps frames per second
Choose a 5:00 second duration.
Choose File->Import->Footage File to bring in images or movies
Drag the image file icon from the Project Window into the Comp Window.
Animate a Fade in
Set the current time to 00:15 frames, drag the timeline over to the right.
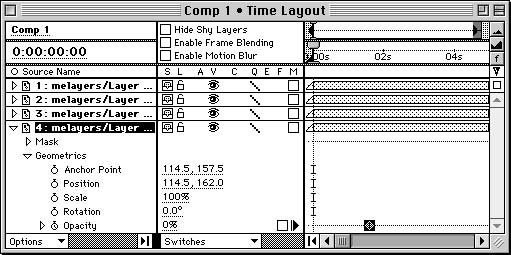
Choose the image in the Time Layout Window, click the triangle to the left to open, and click the triangle next to Geometrics to expand.
Click the time-vary stop watch next to Opacity to set a keyframe.
Change the current time to 00:00.
Click on the underlined 100% under Opacity. Change the value to 0%. This will automatically set a keyframe.
Play through the animation to view the fade in.
Try keyframing other attributes such as scale, Position and Rotation. You can also keyframe any of the effects.
Make a Quicktime Movie
Choose Composition->Make Movie
Save a name
The Render Queue Window will appear
Hold down the arrow across from Render Settings, choose Best Settings.
Hold down the arrow across from Output Module, choose the compression that suits your
needs. Cinepack for playback on the screen, or Sorenson 50% 1200 data rate etc.
Click Render
Double click the Quicktime movie outside of After Effects to view it.
|